
In Angular2 one of the most changing module is Router and since it seems that one very interesting feature is Auth Guards. We will see the live example of Angular2 Route Guards in Authorisation.
What is Angular 2 Route Guards
As name suggests, you can restrict the routes in your application to control how user will navigate to between them, as we want to prevent our users from accessing areas that they’re not allowed to access. These guards are the functions called when user tries to navigate to routes. So that in this function we can write our logic to handle authorisation. We will focus more on the CanActivate guard.
The general rule is that the guards are functions that are called in certain points of the router lifecycle. They return a Boolean or an asynchronous response (Promise or Observable). In the case of CanActivate, the guard function is called when user tries to navigate into the route. The component behind it will only be activated after the function returns true or the Observable / Promise will eventually return true. When the function hangs or returns false, the router will not display the route content. But in most of the case application should be redirect to default route (like login), It is basically bad when application just hang-ups with blank page.
Guard Types
There are five different guard types we can use to protect our routes
| Types | Usages |
|---|---|
| CanActivate | Decides if a route can be activated |
| CanActivateChild | Decides if children route of a route can be activated |
| CanDeactivate | Can user leave the current route? Useful for reminding user to save the unsaved work. |
| CanLoad | Decides if a module can be loaded asynchronously |
| Resolve | It allows to delay the activation of a route until we get some data. |
Depending on what we want to do, we might need to implement one or the other guard.
Defining Guard
Guards can be implemented in different ways, but after all it really boils down to a function that returns either Observable, Promise or boolean.
- CanActivate Guard
There are two ways of defining a guard. A simpler one is just through creating a function, like below:
1. As Function
// file app.routing.ts

const appRoutes: Routes = [
    {path: "", redirectTo: "home", pathMatch: "full"},
    {path: "home", component: HomeComponent, canActivate: ["authGuard"]}
];
export const routingProviders = [{
    provide: "authGuard",
    useValue: authGuard
}];
export function authGuard(route: ActivatedRouteSnapshot, state: RouterStateSnapshot) {
    return true;
}
export const routing: ModuleWithProviders = RouterModule.forRoot(appRoutes);
First, we define a route, “home”, that will display home page. To that goal, we define the guard, by setting the canActivate attribute on the route: [“authGuard“]. As you can see this attribute is an array, so we can define multiple guards, e.g. authenticateGuard, adminGuard, userGuard to better split the Authorisation. Router will iterate over all of them, unless one will deny the access. In the very next line we have define an Angular provider for the function, so that Angular dependency injection could recognise it. This array with single provider will be later used in app.module file in NgModule definition like below:
// file app.module.ts

import {routing, routingProviders} from "./app.routing";

@NgModule({
    import: [routing],
    providers: [routingProviders]
})
export class AppComponent {}
2. As Class
The second option is to define a class that implements the CanActivate interface. Sometimes, a guard needs dependency injection capabilities. In these cases, it makes sense to define a guard as a class, because dependencies can then be simply injected. Let’s say we want to protect a route and have the user authenticate first. We might want to inject an AuthService to determine if the user is authenticated or not. A class guard would be a perfect fit.
When creating a guard class, we implement either the CanActivate, CanDeactivate, or CanActivateChild interface, which requires us to have a method canActivate(), canActivateChild(), or canDeactivate() respectively. Those methods are pretty much the equivalent of a guard function in the previous scenario. The following snippet shows a simple CanActivate guard implementation using classes. Let’s see the example.
// file app.routing.ts
// home route with authguard as a canActive guard
const appRoutes: Routes = [
   {path: "home", component: HomeComponent, canActivate: [authGuard]}
];

// file authGuard.service.ts
// This guard will check whether user is authenticated or not
@Injectable()
export class authGuard implements CanActivate {

    constructor(private router: Router, private authService: AuthService) {}

    public canActivate(route: ActivatedRouteSnapshot, state: RouterStateSnapshot) {
    return this.authService.isLoggedIn();
    }
}

// file app.module.ts
@NgModule({
    providers: [authGuard]
})
export class AppComponent {}
- Multiple Guards
To make our application more secure then it is good to implement multiple guards, consider in your application you have the requirement that user should be authenticated, for some pages you have authorisation in this case create the multiple guards as per the roles in your application.
So let’s dive into the full example of how to guard activation on multiple routes. There are multiple routes in our application. We can divide them into four groups:
Login with no activation guard – everybody can access it.
Home that just requires user to be authenticated.
Payment that requires user to be authenticated and should have user as a role.
Transaction that requires user to be authenticated and should have user as a admin.
Let’s see the Routing
// file app.routing.ts
// Application routes with guards
const appRoutes: Routes = [
   {path: "", component: LoginComponent}
   {path: "login", component: LoginComponent},
   {path: "home", component: HomeComponent, canActivate: [authGuard]},
   {path: "payment", component: PaymentComponent, canActivate: [authGuard, userGuard]},
   {path: "transaction", component: TransactionComponent,
                canActivate: [authGuard, adminGuard]}
];
In above routes, default route is Login and it does not require any authentication so everybody can access it.
For home we just required the user should only have logged in.
For payment we require user to be authenticated, which is ensured by authGuard and then they have role as USER, which is ensured by userGuard.
For transaction we require user to be authenticated, which is ensured by authGuard and then they have role as ADMIN, which is ensured by adminGuard
// file userGuard.service.ts
// This is userGuard to authorise user
@Injectable()
export class userGuard implements CanActivate {

    constructor(private router: Router, private userService: UserService) {}

    public canActivate(route: ActivatedRouteSnapshot, state: RouterStateSnapshot) {
    return this.userService.isUserRole();
    }
}

// file adminGuard.service.ts
// This is userGuard to authorise admin
@Injectable()
export class adminGuard implements CanActivate {

    constructor(private router: Router, private adminService: AdminService) {}

    public canActivate(route: ActivatedRouteSnapshot, state: RouterStateSnapshot) {
    return this.adminService.isAdminRole();
    }
}
- CanDeactivate Guard
We’ve now seen how CanActivate can work in different scenarios, but as mentioned earlier, we have a few more guard interfaces we can take advantage of. CanDeactivate gives us a chance to decide if we really want to navigate away from a route. This can be very useful, for example we want to prevent our users from losing unsaved changes when filling out a form and accidentally clicking on a button to cancel the process.
Implementing a CanDeactivate guard is very similar to implementing a CanActivate guard. All we have to do is to create again, either a function, or a class that implements the CanDeactivate interface.// This is deactiveGuard to restrict from navigation to different route import { CanDeactivate } from '@angular/router'; import { HomeComponent } from './app/home-component'; export class ConfirmDeactivateGuard implements CanDeactivate { canDeactivate(target: HomeComponent) { if (target.hasChanges()) { return window.confirm('Do you really want to cancel?'); } return true; } }here’s one thing that we didn’t see in the previous example. CanDeactivate uses a generic, so we need to specify what component type we want to deactivate.
Now we need to register CanDeactive Guard// file app.module.ts // This is to register ConfirmDeactiveGuard @NgModule({ ... providers: [...ConfirmDeactivateGuard] }) export class AppModule {}
Once we are done with this our application is now ready. The final UI looks like this:
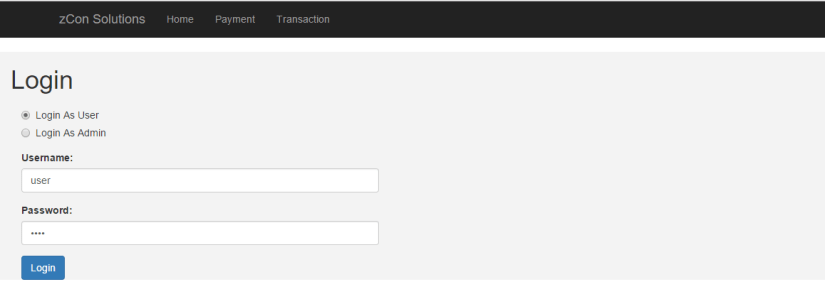
1. Login Screen
2. After Login as User – Home Page 
3. After Click on Transaction Menu ( User Role) 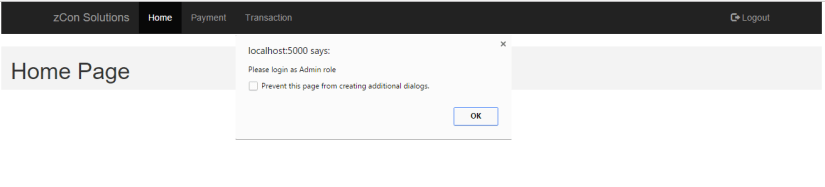
Because currently we have logged in as User Role and Transaction is accessible to admin role only and this will redirect to login page.
4. After Click on Payment Menu (Admin Role) 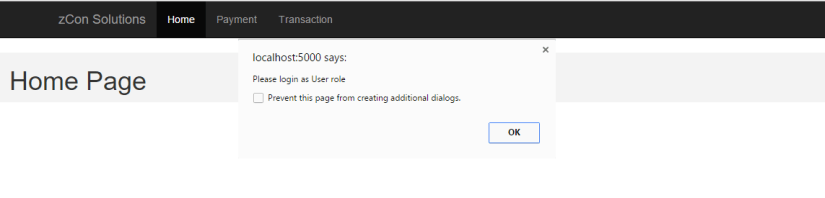
Now Log in as Admin role and then click on Payment this will also give alert message and will redirect to login page because we have logged in as Admin and Payment is accessible to user role only
5. After Click on Payment Menu (User Role) 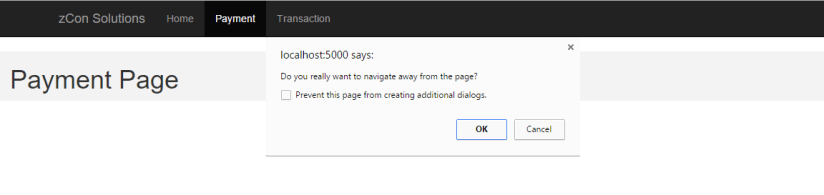
Now again Login as User role and click on payment menu and then again click on home menu this will give you the alert message as “Do you really want to navigate away from the page?” because we have added CanDeactivate guard so this will restrict user from navigating to other routes.
Download sample code from zCon Solutions Github Repo
Written by Dnyaneshwar Uttarwar, Software Engg. at zCon Solutions
