

Image Source: https://circleci.com/
CircleCI is a CICD tool, that is, Continuous Integration – Continuous Deployment tool. It speeds up the deployment process by making it automated. One can execute complex workflows efficiently and quickly with sophisticated caching, Docker layer caching, resource classes for running on faster machines, and performance pricing.
What is CICD?
- Continuous Integration – Integrate all the features in your project to a single branch. Then use this branch for making builds, running tests, and checking test coverage and reports.
- Continuous Deployment – Once your code is ready, push the code to your main branch which is connected to a deployment tool like CircleCI. After that, the deployment process starts automatically and you do not need to do anything else.
So, this complete process makes the life of the developer a lot easier as compared to manual deployment. It saves time. Finally, it increases productivity. The risk of wrong code deployment can be avoided by adding the automated testing and unit testing scripts in the code itself.
CircleCI runs the builds created out of your code in clean containers or virtual machines and throws errors and stops the process of deployment in case of errors.
The developers get notified if tests fail/pass.
Stepwise Guide to Using CircleCI
- Create a repository in a VCS. You can use any VCS supported by CircleCI.
- Create branches as per your features.
- Write unit test cases as well as automated test cases, if needed, for the features.
- Create a single deployment branch.
- Add a yml file, that is a configuration file of CircleCI, to the deployment branch. Add all configurations in it. (We will cover configuration in another section.)
- Merge all features to the deployment branch. And push the commit.
- Once you push the commit the CircleCI pipeline starts automatically as per your configuration.
- The test cases will run and give you results. If they fail, the pipeline stops. If they pass the deployment process starts.
- After deployment is finished the automation script gets executed.
- Finally, code gets deployed successfully, and you will get an email notification of success or failure.
Advantages
So, in this complete process, the role of the developer is to code properly, do the correct configurations just once in the initial stage, and after that just push the code to the deployment branch, and wait for a notification from CircleCI. Isn’t that great for developers?
Also, in this complete automated process if you want a manual touch you can also configure things accordingly: like adding an approval or confirmation step before the actual deployment starts. This adds an extra layer of security during deployment.
A log of every deployment is maintained so you can trace which feature is pushed, and at what time.
In case you need to immediately revert to an older version of your code, you can just check the old deployment pipelines and restart that pipeline, and Voila! the old version is restored!
This process helps in saving time and prevents the terrible things that can happen if your team tries to change code in a hurry.
If you are using any other CICD tool you can easily migrate to CircleCI. The migration steps are given in their official documentation here: https://circleci.com/docs/2.0/migration-intro/#section=getting-started
What is Supported
CircleCI supports deployment of almost all leading languages:
- .NET
- JAVA
- JavaScript
- React / React Native
- C
- Android
Configuration
- Create a directory called CircleCI in the root directory of your local GitHub or Bitbucket code repository.
- Create a yml file in that directory.
This file supports YAML, which is a human-friendly data serialization standard for all programming languages. It is a strict superset of JSON, another data serialization language. This means it can do everything JSON can… and more.
This is the only configuration file you will have in your project and usually, after all configurations are done, you will not need to update this file.
A sample config.yml looks like this:
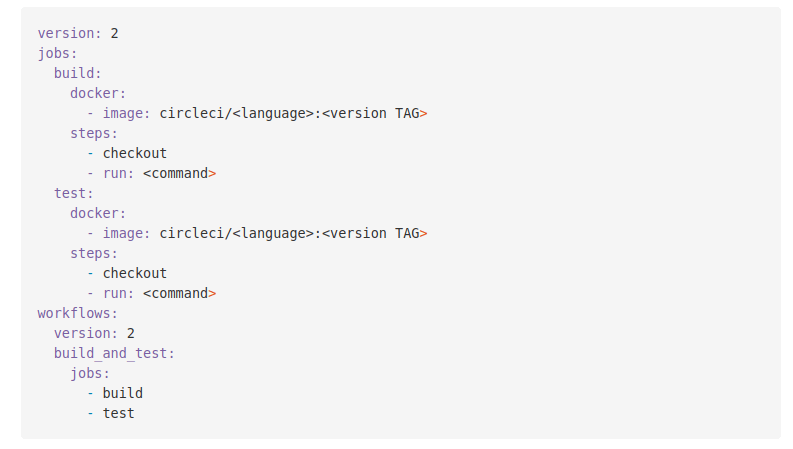
- You need to modify the yml as per your need. Refer https://circleci.com/docs/2.0/configuration-reference/
- You also need to configure a few things on the CircleCI app.
- Log in or sign up using your GitHub account to CircleCI and add a new project there.
- Then set up your project repository there.
- Try by pushing a commit to your branch. If the CircleCI pipeline starts after pushing, you are done!
Start building with CircleCI today with their free plan: https://circleci.com/pricing/
For Additional Blogs –
